Friday 26 June 2015

Fuel pump driver module

This replaces the need for fuel pump relay, and is part of my plan to run a closed loop fuel pressure control system. The advantages of such a system include reduced fuel pump current draw, reduced fuel heating (and hence cooler, denser, intake charge), reduced noise, increased pump and filter lifetimes... 

Initially I will be keeping the adjustable pressure regulator and return line to the tank, however they should be nearly redundant. Over time, if I can get the level of accuracy of the control system good enough, I may be able to remove the regulator and return line and run a fully returnless dead-headed, closed-loop system which will give further weight savings.

The Pectel SQ6 has a number of dedicated PWM outputs, so can drive this VDO Jag/Aston fuel pump driver module directly.


Tuesday 23 June 2015

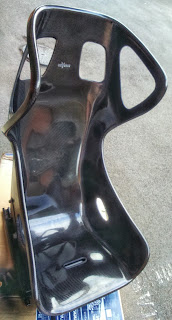
Reverie X R C seat

Ok, so I splashed out and treated myself for the main seat in the house.


The seat is a twin skin, prepreg carbon fibre jobby, with a different weave inner skin to outer. Weight is a barely believable 3.1kg!
Harnesses are STR FIA items, good till 2019, with Schroth 3" pads.


Sunday 21 June 2015

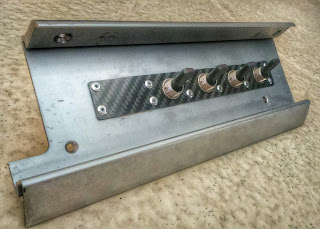
toggle switches

pretty minor update but I did a little bit of wiring prep work today.

pared some more wires out of the loom that are definitely not needed and also built this new switch panel with LED illuminated 30A toggle switches to replace the frankly horrible standard Lotus switches (that I think are from some old Peugeot?!)


Will probably use for headlights, hazards, rear fog and one TBC. There is space for a 5th one also if needed...

Thursday 18 June 2015

powertrain installation complete

we are starting to get close now...!

Last night I installed the RHS manifold and exhaust can for what (touch wood) should be the last time before the car is shaken down.

Some gratuitous engine install pics:


In terms of what is still do do before I can fire up the engine:
  1. Fill with oil (Shell Helix 5w40 ordered and en-route)
  2. Install final coolant hose (currently being welded), fill coolant.
  3. Create engine wiring loom - coils, crank position sensor, cam position sensor, oil pressure sensor, oil temperature sensor, coolant temperature sensor/s, TPS, air temperature sensor, connect injector looms.
  4. Install battery and main power to engine loom. 
  5. Create loom for fuel pump driver module, power to fuel pump, fuel pressure sensor feedback to ECU.
  6. Create loom for EWP control from ECU.
  7. Create loom for Cosworth Omega dash, so all ECU outputs can be displayed.

So quite a bit still to do! Whether I complete all this myself is still a bit up in the air. I might do as much as I feel comfortable with, stuff like the coil looms etc is pretty straightforward. In the meantime I'll continue with the rest of the car, the plan being that I can get it in a rolling chassis state in case I need to take it out to a specialist for the remainder of the wiring and then mapping.

Stay tuned! :)

Monday 15 June 2015

Throttle linkage


So due to the completely custom nature of the engine installation the throttle linkage was going to need some attention.

Firstly I identified that the route of least resistance for the cable, with the largest smoothest bend radii, was going to be down the RHS of the cockpit tub and through the bulkhead, rather than the OE route of down the centre alongside the gear cables and then under the fuel tank!


I purchased the Eliseparts kit as it seemed to get very good reviews and was a decent price. The roller bearing definitely improves the feel and removes some of the slop from the system.


Once I started experimenting with the bits it became apparent that the difficulty was going to be obtaining enough travel at the throttle butterfly end. Eventually I settled on a solution that involved removing the stock pedal stop from behind the pedal, and using the hard contact on the arm to the weldnut to also act as the throttle stop and prevent cable stretch. I had to subtly nibble away at the weldnut and arm in order to:

     1) create slightly additional butterfly travel to enable full throttle.
     2) create a nice even "crescent shaped" contact surface between the two components which shouldn't wear            over time.


The modified arm and weld nut.


Here you can just about see the new cable routing dissappearing along the right hand side of the cockpit tub, rather than centrally.


All nicely painted in black ready for fitment. Note that I drilled a 4th hole for pedal travel just in case. For now I have set the pedal on the furthest hole which is giving quite a long travel, but a really nice smooth operation with probably less pedal effort than standard!

If I decide the travel is a bit too long/not responsive enough for heel-toe action, the other 3 holes will give a more aggressive responsive but with increases in pedal effort. I briefly tried it on hole #4 and it didn't appear too stiff for short term use (less stiff than my old Caterham!!)

Linkage at the engine end for reference. I will try and get a picture of the new cable routing shortly.

Sunday 14 June 2015

more bodywork wrapping

I'll let the pictures speak for themselves on this blog post:

wrapping the doors...


pretty happy with the RHS door and quarter. Tarty billet fuel filler cap added.

I thought doing the handle recess and lock mech would be a nightmare, it actually turned out not too bad. Door difficulty 5/10


roof done. Difficulty 2/10


wing mounts completed now. I'll do a post on the wing itself at a later date...


tailpipe still to be trimmed obviously


Crying out for Jagermeister sponsorship?

Thursday 11 June 2015

making gaskets...

....not fun! :(


But they should work ok. Fitted with a thin smear of WURTH exhaust gasket paste on each side.

Saturday 6 June 2015

exhaust system complete

Got the final welds done on the manifolds and followed that with a couple of coats of VHT high temperature ceramic paint.


Just need to do some very minor bits on the final tailpipe exit, and also cut out 8 header gaskets from composite gasket sheet, then I can fit the exhaust system for real!

Friday 5 June 2015

rear bodywork modifications.

So as is my way with a lot of this build I am going my own way and not necessarily following the "accepted" way of doing things. The treatment I am giving the rear bodywork is no different. :)


So the standard S1 Exige rear clam got chopped into many, many pieces!!

This wasn't wanton butchery however, there are a number of sound engineering objectives:
  1. Allow the rear wing to transfer it's downforce directly to the chassis, rather than 'through' the clamshell as normally found on S1 Elise and Exige builds (normal practice is to mount the wing on the clam, with a spreader plate from the chassis directly beneath supporting the clam and wing loads). My wing mounts pass through slots in the rear valance and mount directly to the longerons.
  2. Allow the rear clam to be removed easily for work on the powertrain. With the level of customisation in my build this was a no-brainer. The cuts I made are slightly different to the S1 'motorsport' kit, but the principle here is the same.
  3. Allow the rear clam to be removed without needing to remove the rear wing every time. This required an additional cut to create a 'rear valance'. The valance is now part of the wing sub-assembly which also includes the silencer mounts. If needed the entire rear wing sub-assembly can be removed with just 6x M8 fasteners.
  4. Lower half of rear clam cut away to try and reduce rear drag and weight. This section of bodywork doesn't really do anything except stop you seeing the engine compartment and obstruct air trying to escape the rear wheel arches. It also weighs a couple of kg. So off it went!


Glassing in returns for bodywork catches.


Lining everything up.

Wrapped Hexis Mandarin Orange. In the background you can see the wing mount sub-assembly built up.


Trialling various options regarding LED rear lights. Note LED rain light bottom centre.